Why you'll love this recipe
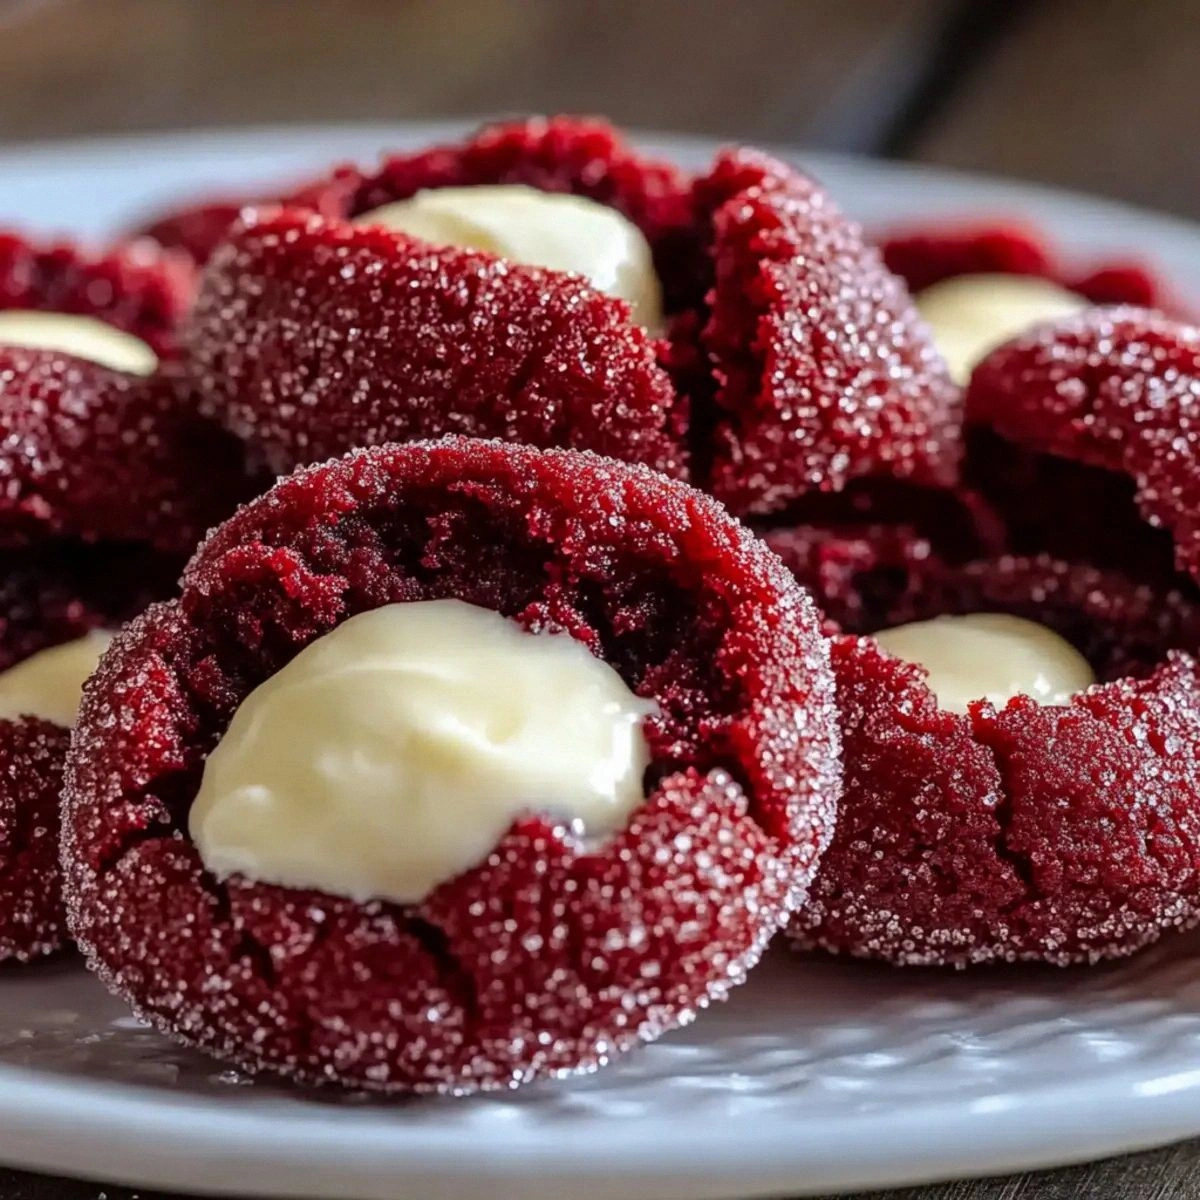
- Crowd-pleaser: vibrant red cookies with creamy center
- Make-ahead: dough chills for easy prep next day
- Kid-approved: sweet, soft bite perfect for tiny hands
- 30-minute: bake time under ten minutes, total under 30
- Freezer-friendly: freeze baked cookies, reheat for fresh taste
I first baked these on a rainy Sunday afternoon, the kitchen lit by golden afternoon light spilling over the counter. The smell of cocoa mingled with the faint tang of cream cheese, and I could hear the soft crackle as the cookies set in the oven. My sister’s eyes widened at the first bite, and we both declared them a new family favorite. A few weeks later, I surprised my friends at a game‑night gathering; the cookies arrived on a rustic platter, still warm, their pink hue bright against the dim lights. The room filled with the same comforting aroma, and as we all reached for a second cookie, I knew this recipe had earned its place on my go‑to list.
The story
The kitchen fills with the sweet scent of cocoa and a faint hint of vanilla as the oven warms, and the first cookie lifts its buttery crust, releasing a soft, pink steam. You hear the quiet sizzle of sugar caramelizing on the edges. One bite reveals a melt‑in‑your‑mouth chew that begs for another.
I first learned this cookie from my grandmother on a rainy Saturday, her hands deftly shaping each thumbprint while the radio played old jazz. The moment the cream cheese filling hit my tongue, I knew it was a family heirloom in the making. I’ve been perfecting the balance ever since.
What sets this version apart is the chilled‑dough technique paired with a buttermilk‑infused batter, giving the cookie a tender crumb that stays chewy, not cakey. The cocoa powder adds depth without overwhelming the classic red‑velvet flavor, and the creamy filling is folded in after cooling to keep its silky texture.
The flavor journey starts with a subtle cocoa bitterness, quickly followed by a sweet, buttery richness, then a bright, slightly tangy cream cheese core that balances the sweetness. The contrast between the crisp sugar‑coated exterior and the soft, melt‑away interior creates a multi‑layered mouthfeel that’s both comforting and indulgent.
These cookies shine on a brunch spread beside fresh berries, or as a dessert station at a holiday potluck, where their vivid color draws the eye. Pair them with a glass of cold milk or a steaming cup of coffee for an easy, crowd‑pleasing treat that can be made ahead and baked fresh for any occasion.
Don’t let the multiple steps intimidate you; the only tricky part is chilling the dough, which actually makes the process easier by preventing over‑spreading. With a simple 30‑minute bake and a quick cream cheese swirl, you’ll have bakery‑quality cookies without the stress.
Why This Recipe Works
- Chilling the dough firms the butter, limiting spread and creating a chewy interior.
- Alternating dry ingredients with buttermilk gently hydrates flour, producing a tender crumb.
- Filling is folded after cookies cool, preserving a silky texture without melting.
Ingredient notes & substitutions
3/4 cup unsalted butter (softened)
Provides richness and helps the cookies spread evenly for a tender chew.
2 tablespoons unsweetened cocoa powder
Adds deep chocolate undertones that balance the sweetness.
1/2 cup buttermilk
Its acidity tenderizes the crumb and adds subtle tang.
4 ounces cream cheese (softened)
Creates the tangy, silky filling that defines the thumbprint.
1 tablespoon red food coloring
Gives the iconic vivid hue without affecting flavor.
Equipment you'll need
Ingredients
- 2 cups all-purpose flour
- 2 tablespoons unsweetened cocoa powder
- 1 teaspoon baking soda
- 1 pinch salt
- 3/4 cup unsalted butter (softened)
- 1 cup granulated sugar
- 2 large eggs (room temperature)
- 1 teaspoon vanilla extract
- 1 tablespoon red food coloring
- 1/2 cup buttermilk
- additional granulated sugar for rolling
- 4 ounces cream cheese (softened)
- 1/4 cup unsalted butter (softened)
- 1 cup powdered sugar (sifted)
- 1/2 teaspoon vanilla extract
Before You Start
- Soften butter to room temperature
- Separate eggs and bring to room temp
- Preheat oven to 375°F
- Line baking sheet with parchment
- Gather all ingredients
Instructions
- 1Step 1
In a medium bowl, whisk together flour, cocoa powder, baking soda, and salt. Set aside.
- 2Step 2
In a large mixing bowl, beat butter and sugar until light and fluffy, about 2-3 minutes.
- 3Step 3
Add eggs one at a time, mixing well after each. Stir in vanilla extract and red food coloring.
- 4Step 4
Gradually add the dry mixture to the wet mixture, alternating with buttermilk until just combined.
- 5Step 5
Wrap the dough in plastic wrap and refrigerate for at least 30 minutes.
- 6Step 6
Preheat the oven to 375°F (190°C). Roll chilled dough into 1-inch balls and roll in granulated sugar.
- 7Step 7
Place balls on parchment-lined baking sheet, spaced 2 inches apart. Create an indent in each ball.
- 8Step 8
Bake for 8-10 minutes or until edges are set. Let cool on baking sheet for 5 minutes.
- 9Step 9
To prepare filling, beat cream cheese and butter until smooth. Gradually add powdered sugar and vanilla until creamy.
- 10Step 10
Once cookies are cool, fill each thumbprint with cream cheese filling.
Pro tips
Chill dough for shape
Wrap the dough and refrigerate at least 30 minutes; it prevents spreading and keeps the thumbprint defined.
Roll in sugar for crunch
Coating each ball in granulated sugar creates a crisp outer shell that contrasts the soft interior.
Don’t overmix after flour
Mix just until combined; overmixing develops gluten and makes the cookie tough.
Create thumbprint before baking
Press a shallow indent with your thumb or a small spoon to hold the filling.
Cool on sheet before filling
Let cookies rest on the baking sheet for 5 minutes so they firm up and don’t melt the filling.
Beat filling until fluffy
Cream cream cheese, butter, and powdered sugar until light; this keeps the center airy.
Use room‑temp eggs
Room‑temperature eggs incorporate more smoothly, giving a uniform batter.
Variations to try
White Chocolate Swirl Version
Melt white chocolate and swirl it into the batter before chilling for a sweet contrast.
Gluten-Free Almond Flour Twist
Replace all‑purpose flour with almond flour; the cookies become nutty and slightly denser.
Vegan Coconut Cream Filling
Swap cream cheese with whipped coconut cream and a dash of lemon juice for a dairy‑free option.
Holiday Peppermint Sprinkle
Add crushed peppermint candy to the filling and sprinkle extra on top before baking for a festive touch.
Serving Suggestions
Troubleshooting
Cookies spread too thin
Chill the dough longer; add a tablespoon more flour if needed.
Filling leaks
Make sure cookies are fully cooled before adding the cream cheese swirl.
Cookies are cakey
Do not overmix the batter and ensure the dough is chilled before baking.
Indent not deep enough
Press a firmer thumbprint after chilling; a deeper well holds more filling.
Storage & make-ahead
Refrigerator
Store in an airtight container; keep up to 5 days.
Freezer
Freeze baked cookies in a single layer, then bag; lasts 2 months. Thaw at room temperature.
Best way to reheat
Warm in a 300°F oven for 5 minutes to revive softness.
Make-ahead
Form dough balls and chill; bake fresh later. Don't bake too early.
Ingredients
- 2 cups all-purpose flour
- 2 tablespoons unsweetened cocoa powder
- 1 teaspoon baking soda
- 1 pinch salt
- 3/4 cup unsalted butter (softened)
- 1 cup granulated sugar
- 2 large eggs (room temperature)
- 1 teaspoon vanilla extract
- 1 tablespoon red food coloring
- 1/2 cup buttermilk
- additional granulated sugar for rolling
- 4 ounces cream cheese (softened)
- 1/4 cup unsalted butter (softened)
- 1 cup powdered sugar (sifted)
- 1/2 teaspoon vanilla extract
Instructions
- 1In a medium bowl, whisk together flour, cocoa powder, baking soda, and salt. Set aside.
- 2In a large mixing bowl, beat butter and sugar until light and fluffy, about 2-3 minutes.
- 3Add eggs one at a time, mixing well after each. Stir in vanilla extract and red food coloring.
- 4Gradually add the dry mixture to the wet mixture, alternating with buttermilk until just combined.
- 5Wrap the dough in plastic wrap and refrigerate for at least 30 minutes.
- 6Preheat the oven to 375°F (190°C). Roll chilled dough into 1-inch balls and roll in granulated sugar.
- 7Place balls on parchment-lined baking sheet, spaced 2 inches apart. Create an indent in each ball.
- 8Bake for 8-10 minutes or until edges are set. Let cool on baking sheet for 5 minutes.
- 9To prepare filling, beat cream cheese and butter until smooth. Gradually add powdered sugar and vanilla until creamy.
- 10Once cookies are cool, fill each thumbprint with cream cheese filling.