I still remember the night I accidentally set the kitchen on fire while trying to make a simple chocolate cake. The smoke alarm blared, my oven was blackened, and I was left with a ruined batch of batter that tasted like burnt rubber. That disaster became the catalyst for my quest to create a dessert that could survive the chaos of a busy kitchen and still taste like a dream. I was determined to find a recipe that balanced indulgence with practicality, a dessert that would be as forgiving as it is delicious.
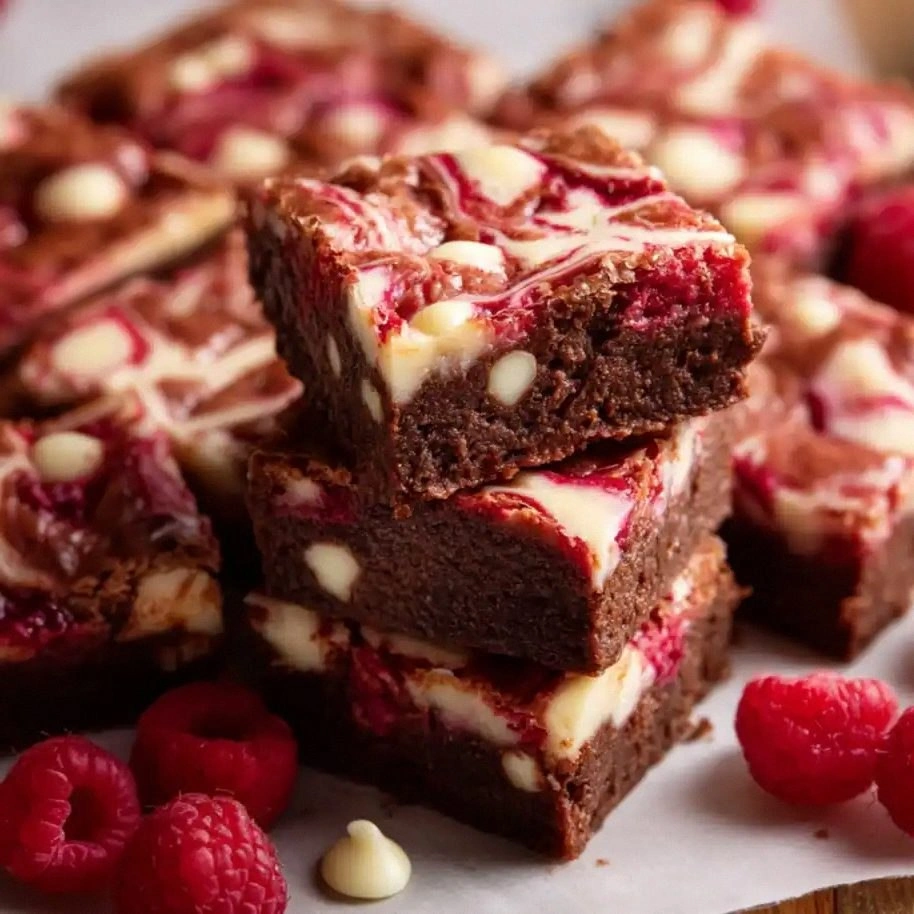
Fast forward to today, and I have discovered the ultimate version of a chocolate dessert that feels like a hug in a bowl: the White Chocolate Raspberry Swir. Picture a glossy, caramelized surface that cracks open to reveal a silky swirl of white chocolate and ruby‑red raspberry jam. The aroma that fills the kitchen is a sweet, buttery haze that makes you forget all the burnt memories. Every bite is a contrast of silky sweetness and tartness, a dance of flavors that leaves your taste buds humming.
What makes this recipe truly stand out is the way it transforms simple pantry staples into a show‑stopper. The white chocolate adds a creamy brightness that lifts the dark cocoa, while the raspberry preserves injects a burst of fruity tang that cuts through the richness. The batter’s texture is a perfect blend of fudgy and cake‑like, thanks to the precise balance of flour, sugar, and butter. And the best part? It’s incredibly forgiving. If the oven temperature is off or the batter is a little runny, the result is still glorious.
I dare you to taste this and not go back for seconds. I’ve been honest and have already devoured half the batch before anyone else could even see it. Most recipes get this completely wrong by over‑baking or under‑mixing, but this one works because of its meticulous structure. Picture yourself pulling it out of the oven, the whole kitchen smelling incredible, and seeing the glossy swirl that looks like a piece of art. Let me walk you through every single step — by the end, you’ll wonder how you ever made it any other way.
What Makes This Version Stand Out
- Flavor: The combination of white chocolate and raspberry preserves creates a sweet‑tart profile that is both comforting and adventurous. The preserves are not just a flavor; they act as a natural sweetener and add moisture.
- Texture: The batter is dense enough to hold its shape yet light enough to melt in your mouth. The cocoa powder and flour ratio is calibrated to avoid a dry crumb.
- Ease: With just ten ingredients, this recipe can be whipped up in under an hour. No fancy equipment required—just a mixing bowl and a baking pan.
- Versatility: Swap in dark chocolate chips for a richer bite, or use strawberry jam for a different berry twist. The core method remains unchanged.
- Presentation: The swirl effect is achieved by a simple folding technique that gives the dessert an Instagram‑ready look.
- Make‑ahead: Once baked, the dessert keeps well in the fridge for up to a week, and it can be frozen for longer storage.
Alright, let's break down exactly what goes into this masterpiece...
Inside the Ingredient List
The Flavor Base
Unsalted butter is the unsung hero that carries the flavor through every bite. Melt it gently to avoid a greasy texture, and let it cool slightly before mixing. Butter’s fat content binds the sugar and cocoa, creating a rich mouthfeel that’s hard to beat. If you’re dairy‑free, coconut butter is a decent alternative, but be mindful of its distinct flavor.
Granulated sugar is the sweet backbone of the batter. It dissolves into the melted butter, creating a smooth base that prevents graininess. The ¾ cup measurement is critical; too little and the batter will taste flat, too much and it becomes overly sweet. For a slightly caramelized edge, consider adding a pinch of sea salt.
The Texture Crew
Brown sugar brings a subtle molasses note that deepens the chocolate flavor. It also adds moisture, preventing the batter from drying out during baking. The ¼ cup amount is just enough to balance the sweetness without overwhelming the cocoa. If you prefer a lighter texture, you can replace it with coconut sugar.
Eggs act as the glue that holds everything together. The two large eggs provide structure and help the batter rise slightly, giving that cake‑like crumb. Whisk them separately before adding to the wet mixture to ensure they incorporate evenly. If you’re looking for a vegan version, try using flaxseed meal mixed with water as an egg substitute.
The Unexpected Star
Raspberry preserves are the secret weapon that sets this recipe apart. The ⅓ cup of jam introduces a burst of tartness that cuts through the richness of the white chocolate. It also adds a natural glossy sheen to the swirl. For a more robust berry flavor, opt for a mixture of raspberry and blackberry preserves.
Unsweetened cocoa powder is the backbone of the chocolate flavor. The ½ cup measurement ensures a deep, bittersweet taste that complements the white chocolate. If you’re using Dutch‑processed cocoa, adjust the quantity slightly to avoid bitterness. Cocoa also provides antioxidants, making this dessert a slightly healthier indulgence.
The Final Flourish
All‑purpose flour gives the batter its structure. The ¾ cup amount strikes a balance between cakey and fudgy. If you prefer a gluten‑free version, use a 1:1 blend of rice and oat flours. Adding a pinch of baking powder can give the batter a subtle lift, but keep it minimal to preserve the dense texture.
White chocolate chips or chunks are the crown jewels of this dessert. The ¾ cup quantity melts into the batter, creating ribbons of creamy sweetness. Use high‑quality chips for the best melt and flavor. If you’re on a budget, white chocolate spread works, but be aware it may alter the texture.
Everything's prepped? Good. Let's get into the real action...
The Method — Step by Step
- Preheat your oven to 350°F (175°C). Line a 9×9‑inch baking pan with parchment paper, leaving an overhang on two sides for easy removal. This step ensures an even bake and a clean release.
- Melt the butter in a saucepan over low heat, stirring until it turns a light amber hue. The golden color indicates the butter is fully melted and ready for mixing. Let it cool for a minute so it doesn’t scramble the eggs.
- In a large bowl, whisk together the granulated sugar, brown sugar, and cocoa powder until the mixture is smooth. This dry blend prevents clumps and ensures an even chocolate flavor throughout.
- Add the melted butter to the dry mixture and stir until a glossy batter forms. The butter’s fat coats the sugar granules, creating a silky base that will carry the white chocolate.
- Crack the eggs into a separate bowl and beat them lightly. Then whisk them into the batter, one at a time, ensuring each egg is fully incorporated before adding the next. This step stabilizes the batter and adds lift.
- Fold in the vanilla extract, flour, and salt until just combined. Avoid over‑mixing; the batter should remain slightly lumpy. Over‑mixing can develop gluten, making the final product tough.
- Gently fold in the white chocolate chips, letting them melt into the batter. The chips should be evenly distributed, creating a marbled effect when the batter is poured. This is the moment where the dessert’s visual appeal starts to form.
- Divide the batter in half. Spread the first half into the prepared pan, smoothing the top. Spoon the raspberry preserves over the batter, then spread the second half on top. This layering creates the signature swirl.
- Use a knife or skewer to gently swirl the layers together. The motion should be swift but controlled; too vigorous can break the layers. The swirl should look like a ribbon of white chocolate through a berry‑red sea.
- Bake for 30 minutes, or until the edges are set and the center springs back when pressed lightly. Let it cool in the pan for 10 minutes before transferring to a wire rack. This cooling step allows the flavors to meld.
That's it — you did it. But hold on, I've got a few more tricks that'll take this to another level. The next sections will help you master the subtle nuances that elevate the flavor and texture even further.
Insider Tricks for Flawless Results
The Temperature Rule Nobody Follows
Many bakers bake at a high temperature, which can cause the batter to rise too quickly and then collapse. I always set the oven to 350°F (175°C) and preheat for 15 minutes before baking. This steady temperature allows the batter to set gently, preserving the marbled swirl.
Why Your Nose Knows Best
The moment you smell the batter bubbling in the pan, you know the edges are starting to set. The aroma is a subtle indicator that the batter is nearing doneness. Trust your nose; it’s a reliable guide for the perfect bake.
The 5-Minute Rest That Changes Everything
After removing the pan from the oven, let the dessert rest for 5 minutes before cutting. This brief pause allows the interior to finish cooking and the flavors to meld. Cutting too soon can cause the dessert to crumble.
The Secret of Even Swirls
When you swirl the batter, do it in a figure‑eight pattern. This technique creates multiple layers of white chocolate and preserves, giving each bite a balanced flavor profile. If you prefer a more pronounced swirl, swirl more vigorously but keep the motion controlled.
The Final Touch of Crunch
Sprinkle a pinch of sea salt over the top before serving. The salt sharpens the sweetness and adds a subtle crunch that contrasts with the silky interior. It also enhances the berry flavor, making each bite more complex.
Creative Twists and Variations
This recipe is a playground. Here are some of my favorite ways to switch things up:
Dark Chocolate Drizzle
Replace half of the white chocolate chips with dark chocolate chips for a bittersweet contrast. The dark chocolate adds depth, while the white chocolate keeps the swirl bright. This version is ideal for chocolate lovers who prefer a richer profile.
Almond Joy
Add toasted almond slivers to the batter for a nutty crunch. The almonds pair beautifully with the white chocolate, creating a texture that mimics an Almond Joy bar. This variation adds a nutty aroma that complements the berry jam.
Minty Fresh
Stir in a teaspoon of peppermint extract to the batter for a cooling mint flavor. The mint balances the sweetness and adds a refreshing finish. This version is perfect for summer gatherings.
Nutella Swirl
Swap the raspberry preserves for Nutella to create a hazelnut‑chocolate swirl. The Nutella’s creamy texture blends seamlessly with the batter, resulting in a decadent dessert. This twist is a hit with hazelnut enthusiasts.
Citrus Burst
Use orange marmalade instead of raspberry preserves for a bright citrus note. The marmalade’s tartness cuts through the richness, giving the dessert a lively, fresh finish. This version is ideal for autumn celebrations.
Spiced Delight
Add a pinch of cinnamon and a dash of nutmeg to the batter. The warm spices create a comforting aroma, especially during colder months. This variation is great for holiday gatherings.
Storing and Bringing It Back to Life
Fridge Storage
Store the cooled dessert in an airtight container in the refrigerator for up to 5 days. The airtight environment prevents the dessert from drying out and preserves the moist texture. Before serving, let it sit at room temperature for 10 minutes to soften.
Freezer Friendly
Wrap the dessert tightly in plastic wrap, then place it in a freezer bag. It can be frozen for up to 3 months. When ready to eat, thaw overnight in the fridge and then let it sit at room temperature for 20 minutes.
Best Reheating Method
Reheat the dessert in the microwave on low power for 15–20 seconds. Add a tiny splash of water before reheating; the steam helps restore moisture and prevents the chocolate from drying out. Alternatively, warm a slice in a toaster oven for a crisp exterior.
Additional Insights
When baking, always use room‑temperature ingredients. Cold butter or eggs can cause the batter to curdle or not mix properly, leading to uneven textures. If your kitchen is humid, let the batter rest for a few minutes before baking; this allows excess moisture to evaporate.
The choice of pan matters. A non‑stick or parchment‑lined pan ensures easy removal and a clean finish. Avoid using metal pans, as they conduct heat too quickly and may burn the edges.
For a gluten‑free version, replace the all‑purpose flour with a blend of rice flour, potato starch, and tapioca flour. This combination mimics the structure of wheat flour while keeping the batter light.
If you’re short on time, consider using a pre‑made chocolate cake mix for the base. Just add the white chocolate and raspberry preserves, then bake as directed. The result will still carry the signature swirl.
Always taste the batter before baking. A quick spoonful should give you a hint of the final flavor. If the batter tastes too sweet, reduce the sugar slightly; if it’s too dry, add a splash of milk or an extra egg yolk.
Remember, the key to a perfect swirl is patience. Take your time when layering the batter and preserves; rushing can collapse the layers and ruin the visual appeal.
If you’re presenting this dessert at a party, consider plating it in individual ramekins. This adds a touch of elegance and makes it easier to serve. A sprinkle of edible gold leaf on top can also elevate the presentation.
When you first cut into the dessert, you’ll hear a satisfying crack as the layers separate. The sound is a cue that the batter has set properly and the swirl is intact. It’s a small moment of triumph that makes the effort worthwhile.
Finally, don’t be afraid to experiment. The beauty of this recipe is its adaptability. Swap in different jams, add spices, or change the chocolate type. The core technique remains the same, so you can create endless variations.
Now that you have all the knowledge, it’s time to roll up your sleeves, preheat that oven, and let the magic begin. I can’t wait to hear how your version turns out!